Authentication and Permissions
Authentication Options
Each of the required modules used by Microsoft365DSC has its own authentication possibilities. So depending on the DSC resource you are using, there are several authentication options to choose from.
It is also very important to understand the authentication process of Microsoft365DSC. The solution supports connecting to the various workloads for either applying the configuration, monitoring it for configuration drifts or taking a snapshot of an existing configuration. There are two ways of authenticating to Microsoft 365:
- A set of credentials for a user
- A Service Principal by specifying parameters such as an Azure Active Directory (AD) Application ID, Tenant ID and a Secret or Certificate.
Currently, each Microsoft 365 workload can support a different combination of authentication methods because of the underlying modules only supporting those methods. The table in the next paragraph shows which workload uses which module and therefore supports which authentication method.
Important: The recommendation is to use Service Principal whenever possible because:
- Service principals offers the most granular levels of security and do not introduce the risk of having to send high privileged credentials across the wire to authenticate.
- Since Desired State Configuration is an unattended process, the use of Multi Factor Authentication for user credentials is not supported by Microsoft365DSC.
- Note: The only exception here is creating an Export of an existing tenant. Most often this is an interactive process where the ask for a second factor is possible.
Authentication Methods
The following table provides an overview of what authentication methods are supported by which workload and what underlying module is being used to authenticate:
| Workload | PowerShell Module | Credential | Service Principal | Managed Identity | Access Tokens | ||
|---|---|---|---|---|---|---|---|
| Certificate Thumbprint | Certificate Path | Application Secret | |||||
| AzureAD* | Microsoft.Graph.Authentication (Connect-MgGraph) |
 |
|
 |
|
|
|
| Exchange Online | ExchangeOnlineManagement (Connect-ExchangeOnline) |
|
|
|
|
|
|
| Intune* | Microsoft.Graph.Authentication (Connect-MgGraph) |
|
|
|
|
|
|
| Office 365* | Microsoft.Graph.Authentication (Connect-MgGraph) |
|
|
|
|
|
|
| OneDrive | PnP.PowerShell (Connect-PnPOnline) | |
|
|
|
|
|
| Power Apps | Microsoft.PowerApps. Administration.PowerShell |
|
|
|
|
|
|
| Planner* | Microsoft.Graph.Authentication (Connect-MgGraph) |
|
|
|
|
|
|
| Security & Compliance Center | ExchangeOnlineManagement (Connect-IPPSSession) |
|
|
|
|
|
|
| SharePoint Online | PnP.PowerShell (Connect-PnPOnline) |
|
|
|
|
|
|
| Teams | MicrosoftTeams (Connect-MicrosoftTeams) |
|
|
|
|
|
|
We are having discussions with the various product groups that are responsible for these PowerShell modules inside of Microsoft, to have better consistency across all workloads on how to authenticate. Items in the table above marked with a asterisk (*), are workloads for which the Microsoft Graph PowerShell SDK is used to authenticate against. The plan is to update the underlying logic of every component inside of Microsoft365DSC to leverage that SDK as new APIs become available on Microsoft Graph.
It is possible for a configuration to use a mix of Credentials and Service Principals to authenticate against the various workloads. For example, if you decide to keep a master configuration for all the configuration of your tenant, you could have Azure AD components use the Service Principal of an app you have created to authenticate, and further down in the configuration have your Security and Compliance components use credentials. That approach is perfectly fine, but we would recommend to try and split different workloads across different (composite) configuration files. That way the configuration becomes less complex and easier to manage.
It is also important to note that we have added logic inside of the commands that allow you to take a snapshot of your current tenant configuration to warn you when the components you are trying to capture can’t be accessed based on the authentication model you have selected.
For example: If you are trying to take a snapshot of both Azure AD and Security and Compliance components, but are authenticating using a Service Principal, the tool will warn you that the Security and Compliance components can’t be captured and that they will be ignored. In this case, the resulting capture would only contain the Azure AD components because those are the only ones the tool can get access to using Service Principal.

Power Apps Permissions
In order to authenticate to Power Apps using a Service Principal (Certificate Thumbprint or ApplicationSecret), you will first need to define your app as a Power App Management app. For details on how to proceed, please refer to the following link: https://learn.microsoft.com/en-us/power-platform/admin/powershell-create-service-principal#registering-an-admin-management-application
Additionally, to be able to authenticate using a Certificate Thumbprint, the underlying Power Apps PowerShell module used by Microsoft365DSC requires the certificate's private key (.pfx) to be registered under the current user's certificate store at Cert:\CurrentUser\My\. Omitting to register the private key will result in Microsoft365DSC throwing the following error when trying to authenticate to the Power Platform:
Get-Item: Cannot find path 'Cert:\CurrentUser\My\****************************************' because it does not exist.
Microsoft Graph Permissions
Most components of the Microsoft365DSC solution are using the Microsoft Graph PowerShell SDK under the cover to authenticate and interact with Microsoft 365. The Graph API has two different authentication implementations:
-
Delegated permissions: Here a username/password is used to authenticate.
This option is using an AzureAD app in the background to call the Graph API (named "Microsoft Graph PowerShell"). However the effective permissions will be the intersection of the delegated permissions and the user privileges. By default, the Graph app has no permissions meaning it can't access anything and therefore won't work. You have to grant these permissions to the app before using them. Consent for these permissions can be given by the user himself or by an admin for all users in the tenant.
For example: If your account only has permissions on three SharePoint sites, only these sites can be retrieved. Even when the AzureAD app has Sites.FullControll.All permissions granted.
Using the Graph API with Delegated Permissions and the default App Registration To update the delegated permissions on the Graph app, you can use the Update-M365DSCAllowedGraphScopes cmdlet and specify the resources you are using. This will read the required permissions for those resources and update those on the Graph app.
NOTE: It is possible to specify your own App registration when using Delegated permissions, but if you don't, the generic Graph app is created and used.
-
Application permissions: Here authentication is done using app credentials (either using a secret or certificate).
This option requires your own app to be registered in Azure AD. You can specify what permissions you want your app to have or even create an app for each workloads if necessary. Effective permissions will always be the granted permissions (an user context does not exist). Only admins can grant these permissions.
NOTE: This is the easiest option to use.
Using the Graph API with a custom application
IMPORTANT: Applications with high privileges should be monitored closely. In practice there are advantages to use conditional access policies for these applications to limit access to specific sources or user accounts.
Check out the links in the "More information" section below to learn more about creating your own Azure Active Directory application registration and granting permissions.
Determine Required Permissions
In order to be able to interact with these components, you need to grant your application or the Microsoft Graph PowerShell one the proper permissions against the Microsoft Graph scope. To determine what permissions are required by a given component that uses Microsoft Graph, you can use the Get-M365DSCCompiledPermissionList cmdlet and pass in the list of parameters for which you wish to grant permissions for.
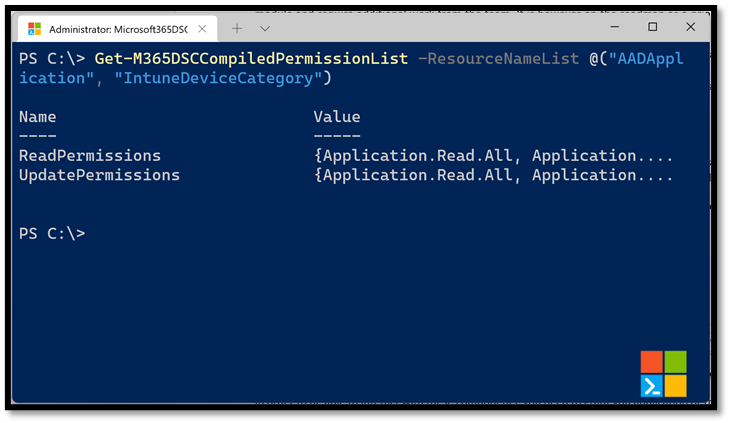
Doing so will return an object with two properties. The ReadPermissions property contains a list of the minimal permissions that need to be granted for the app to be able to read information about the selected components. These are the permissions you want to grant if you are taking a snapshot of the configuration of an existing tenant. The second property, UpdatePermissions, contains the minimal permissions required to interact with and configure the selected components. You will need to grant your application these permissions if you are trying to apply a configuration onto a tenant.
By default, this cmdlet outputs the permissions required for Delegated permissions. To output the Application permissions, use the PermissionsType parameter
Get-M365DSCCompiledPermissionList -ResourceNameList @('AADUser', 'AADApplication') -PermissionsType 'Application'
If you are trying to interact with all available components in Microsoft365DSC, you can get a complete picture of all permissions required across all resources by running the following line of PowerShell.
Get-M365DSCCompiledPermissionList -ResourceNameList (Get-M365DSCAllResources)
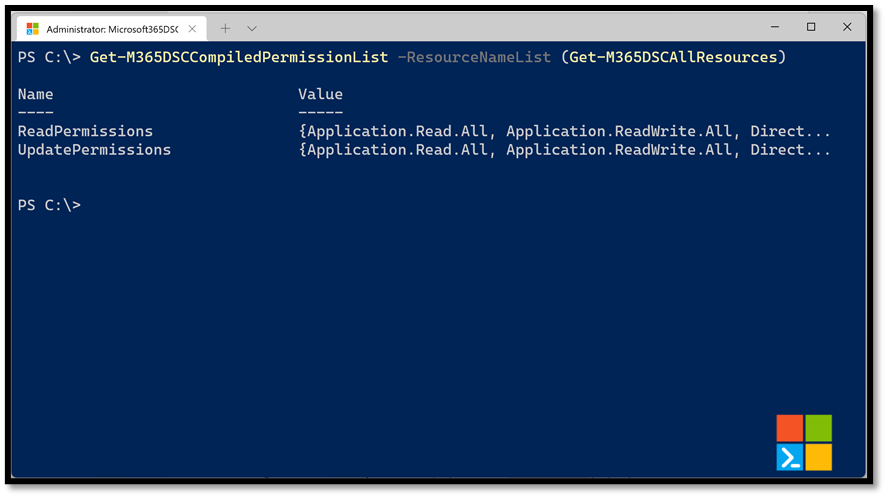
The Get-M365DSCAllResources cmdlet will return a list of all components available inside of the Microsoft365DSC solution which will then by passed in the Get-M365DSCCompiledPermissionList cmdlet which will compile the resulting permissions needed for the list of components it receives, in occurrence all of them. These permissions need to be granted to your application instance, either using the Azure portal or automating the process via PowerShell.
Providing Consent For Graph Permissions
We provide an easy way of consenting permissions to the Delegated Permissions application "Microsoft Graph PowerShell" in your tenant with the Update-M365DSCAllowedGraphScopes cmdlet. This cmdlet accepts either a list of components to grant the permissions for or can grant it for all resources if the -All switch is used. You also need to specify what type of permissions, Read or Update, you wish to grant it using the -Type parameter.
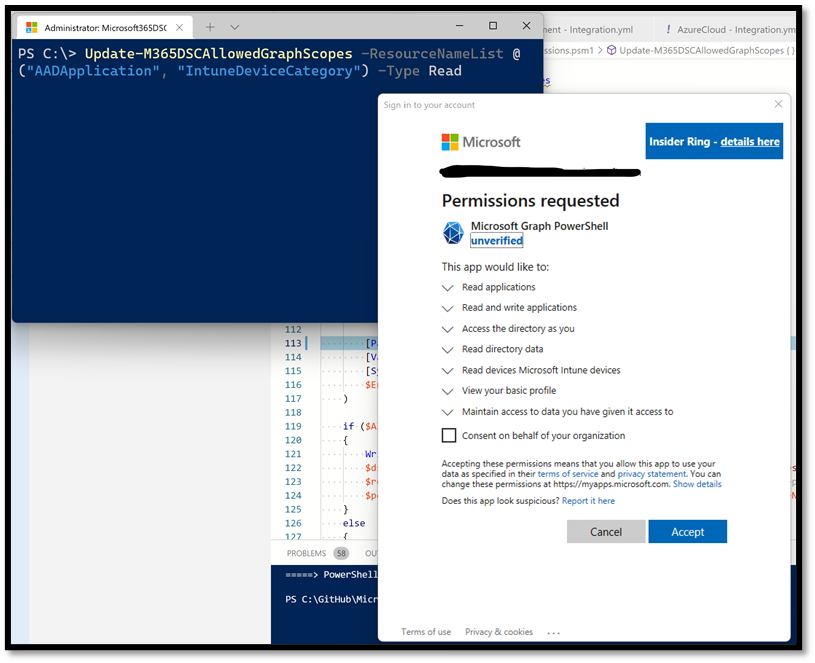
Executing the cmdlet will prompt you to authenticate using an administrator account that has access to consent permissions to Azure AD applications in your environment.
NOTE: If you get the error "Device code terminal timed-out after 120 seconds", check out the Troubleshooting section
Creating a custom service principal
As mentioned earlier in this article, there is also the possibility to use Application permissions or custom service principal to authenticate against Microsoft 365. This custom service principal can be created and configured manually, but Microsoft365DSC also offers the Update-M365DSCAzureAdApplication cmdlet. With this cmdlet, you can create the custom service application, grant the correct permissions, provide admin consent and create credentials (secret or certificate).
Update-M365DSCAzureAdApplication -ApplicationName 'Microsoft365DSC' -Permissions @(@{Api='SharePoint';PermissionName='Sites.FullControl.All'}) -AdminConsent -Type Secret -Credential (Get-Credential)
or
Update-M365DSCAzureAdApplication -ApplicationName 'Microsoft365DSC' -Permissions @(@{Api='SharePoint';PermissionName='Sites.FullControl.All'}) -AdminConsent -Type Certificate -CreateSelfSignedCertificate -CertificatePath c:\Temp\M365DSC.cer -Credential (Get-Credential)
SharePoint PnP PowerShell Permissions
All SharePoint Online resources are using the SharePoint PnP PowerShell module. Just like the Graph module, you can use the default PnP PowerShell app registration or create your own app registration.
Note: For more information about authentication in PnP PowerShell, check out this article.
Default PnP PowerShell app registration
Use the "Register-PnPManagementShellAccess" cmdlet to register this application in Azure Active Directory and grant the correct permissions.
Using your own Azure AD app
Create a new app registration in Azure AD yourself and grant the correct permissions to this app. The documentation on this website for each of the SharePoint Online resources list the permissions needed for the resource.
As an alternative, you can use the "Register-PnPAzureADApp" cmdlet to have PnP PowerShell create the app registration for you and grant the correct permissions.
Using Application Secret
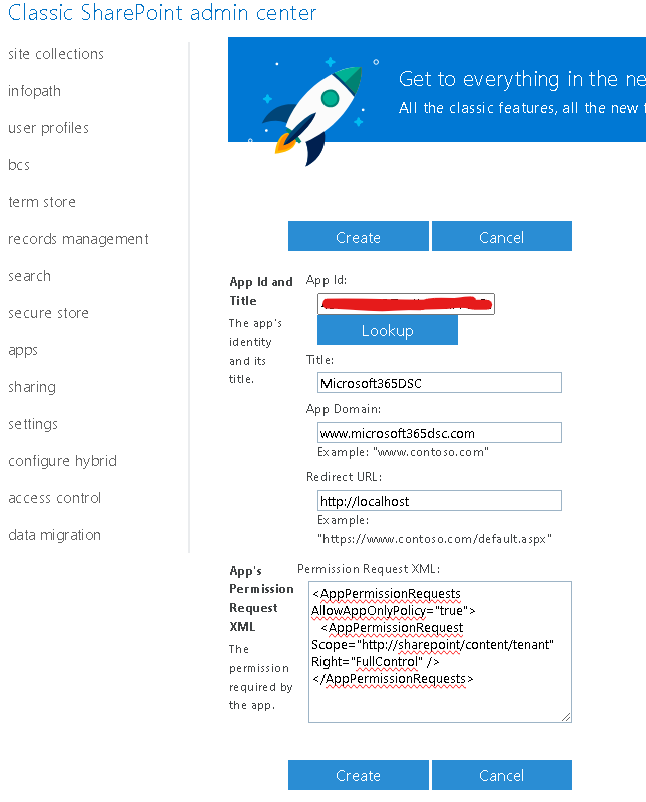
SharePoint Online uses the legacy ACS model to authenticate using an Application Secret. In order to get started with it, you will need to register your Azure AD App against your tenant.
- Navigate to https://
-admin.sharepoint.com/_layouts/15/appinv.aspx. - In the App Id box, type in the application id of your Azure AD App you wish to authenticate with and click on the Lookup button.
- In the App domain box, type in www.
.com. - Leave the Redirect URL box empty.
- In the Permission request XML box, put in the following XML:
  <AppPermissionRequests AllowAppOnlyPolicy="true">
    <AppPermissionRequest Scope="http://sharepoint/content/tenant" Right="FullControl" />
  </AppPermissionRequests>
- Click on the Create button.
- On the next screen, click on the Trust It button to complete the registration process.
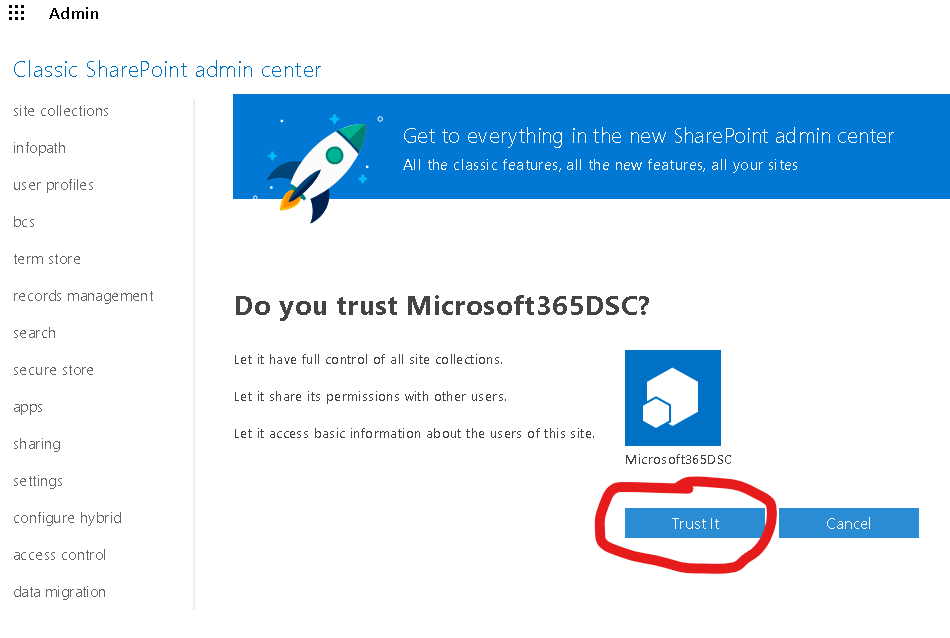
You should now be able to connect to SharePoint Online using an Application Secret.
Exchange Permissions
For the Exchange Online resources, the service account needs certain permissions in order to be able to connect and manage the settings in Exchange Online. You can request the required permissions/roles and the corresponding rolegroups using the Get-M365DSCCompiledPermissionList cmdlet.
To request the permissions,
Get-M365DSCCompiledPermissionList -ResourceNameList @('EXOAcceptedDomain')

Then make sure your service account is a member of the specified Role Group or has been granted the required roles.
NOTE: There are resources, like the EXOAddressList which roles by default are not granted to any of the default role groups. Make sure you grant these permissions correctly before using them.
Security and Compliance Center Permissions
If you want to leverage Service Principal Authentication (using an App Registration) for Security and Compliance Center, there are a few extra configuration steps that need to be followed to grant proper permission to your app. Failure to follow these steps will results in the the cmdlets returning empty results.
Create a new Service Principal and associate it with your app registration:
Start by connecting to the Security and Compliance PowerShell module and run the following line to create the service principal. The cmdlets refer below won't be available if you don't connect first (use the Connect-IPPSsession cmdlet). The AppID and ObjectID represent the application id and its object id. You can retrieve these by navigating to your app instance on the Azure Portal or by leveraging the Get-MgApplication cmdlet from the Graph PowerShell SDK. In my case, my custom App Registration in Azure AD is named "MySCApp" and I am giving the name SC-SPN to the new service principal I am creating.
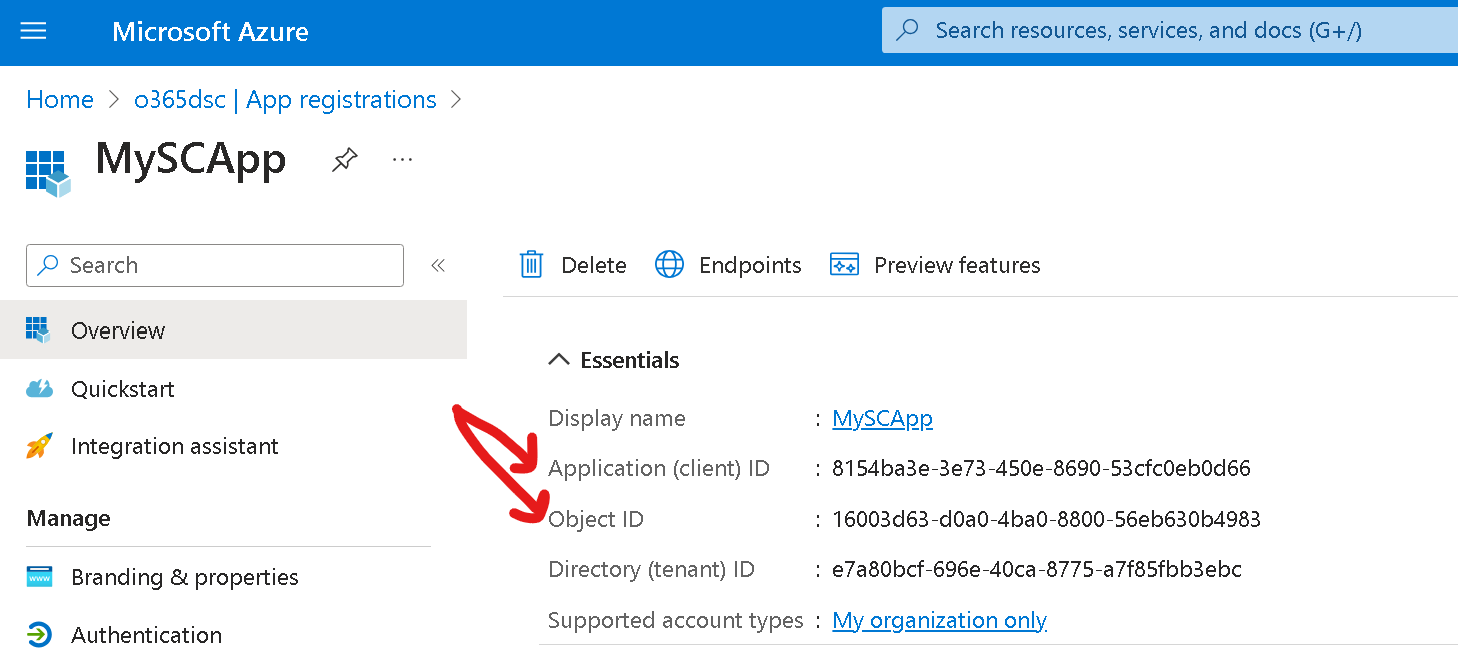
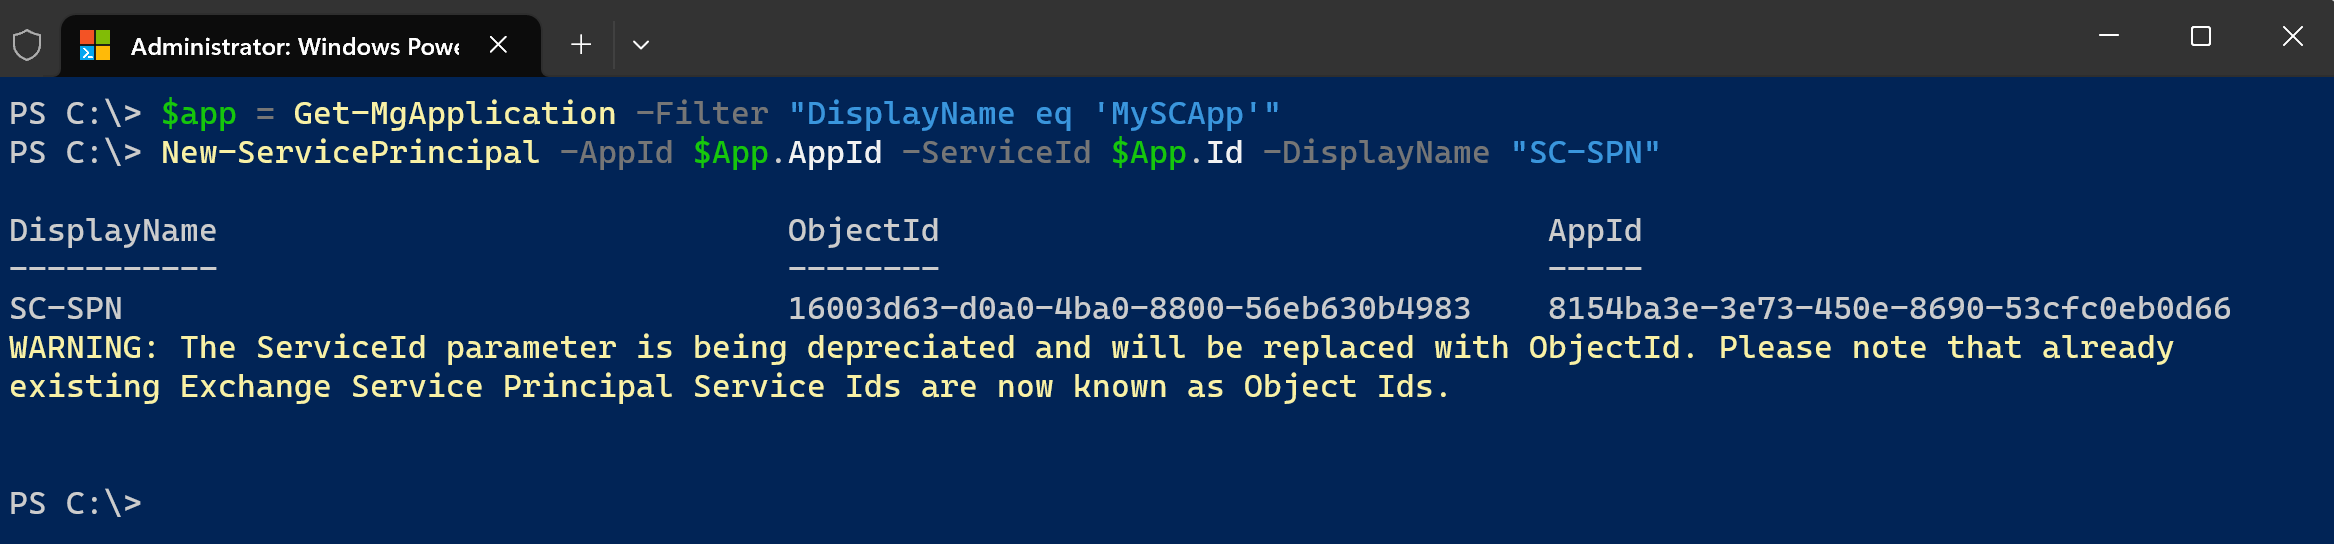
$App = Get-MgApplication -Filter "DisplayName eq 'MySCApp'"
New-ServicePrincipal -AppId $App.AppId -ServiceId $App.Id -DisplayName "SC-SPN"
Grant the eDiscovery Manager role to your new Service Principal:
Run the following PowerShell command to grant the eDiscovery Manager role to your new Service Principal. The ID passed is the Object ID of the Service Principal you created at the previous step. If you don't have it handy, you can use the Get-ServicePrincipal cmdlet to retrieve it.

$SPN = Get-ServicePrincipal -Identity "SC-SPN" Add-RoleGroupMember -Identity eDiscoveryManager -Member $SPN.ObjectId-
Add the Service Principal as a case admin:
The Service Principal requires one last permission in order to be able to retrieve values from the Security and COmpliance center cmdlets. Run the following PowerShell command to add it as a case admin:

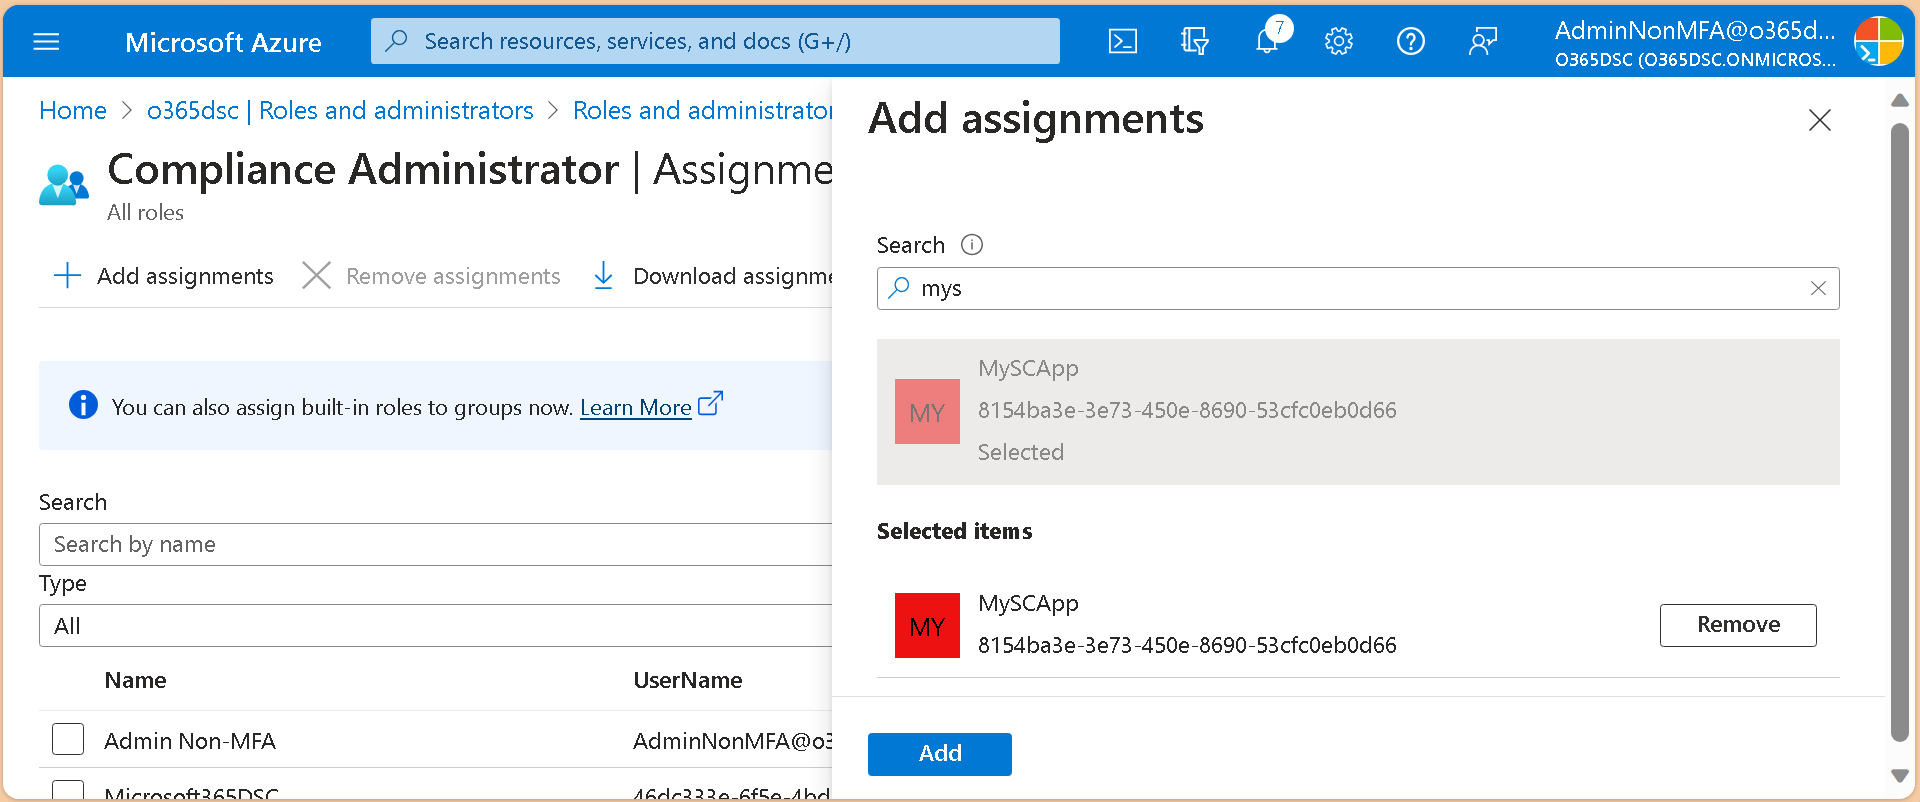
$SPN = Get-ServicePrincipal -Identity "SC-SPN"
Add-eDiscoveryCaseAdmin -User $SPN.Name
Grant your app registration the Compliance Administrator role:
The last required step is to add your app registration to the Compliance Administrator role.
We are now ready to authenticate using our app registration to test and confirm that all is working as expected. To do so, you can use the Connect-M365Tenant cmdlet and pass it the information related to your app registration. Below is an example using our app registration. Replace the appid, tenantid and certificatethumbprint parameters by your own. If you are getting an error connecting, you probably haven't granted the Exchange ManageAsApp permission to your app as described in the following article: https://learn.microsoft.com/en-us/powershell/exchange/app-only-auth-powershell-v2?view=exchange-ps#step-2-assign-api-permissions-to-the-application
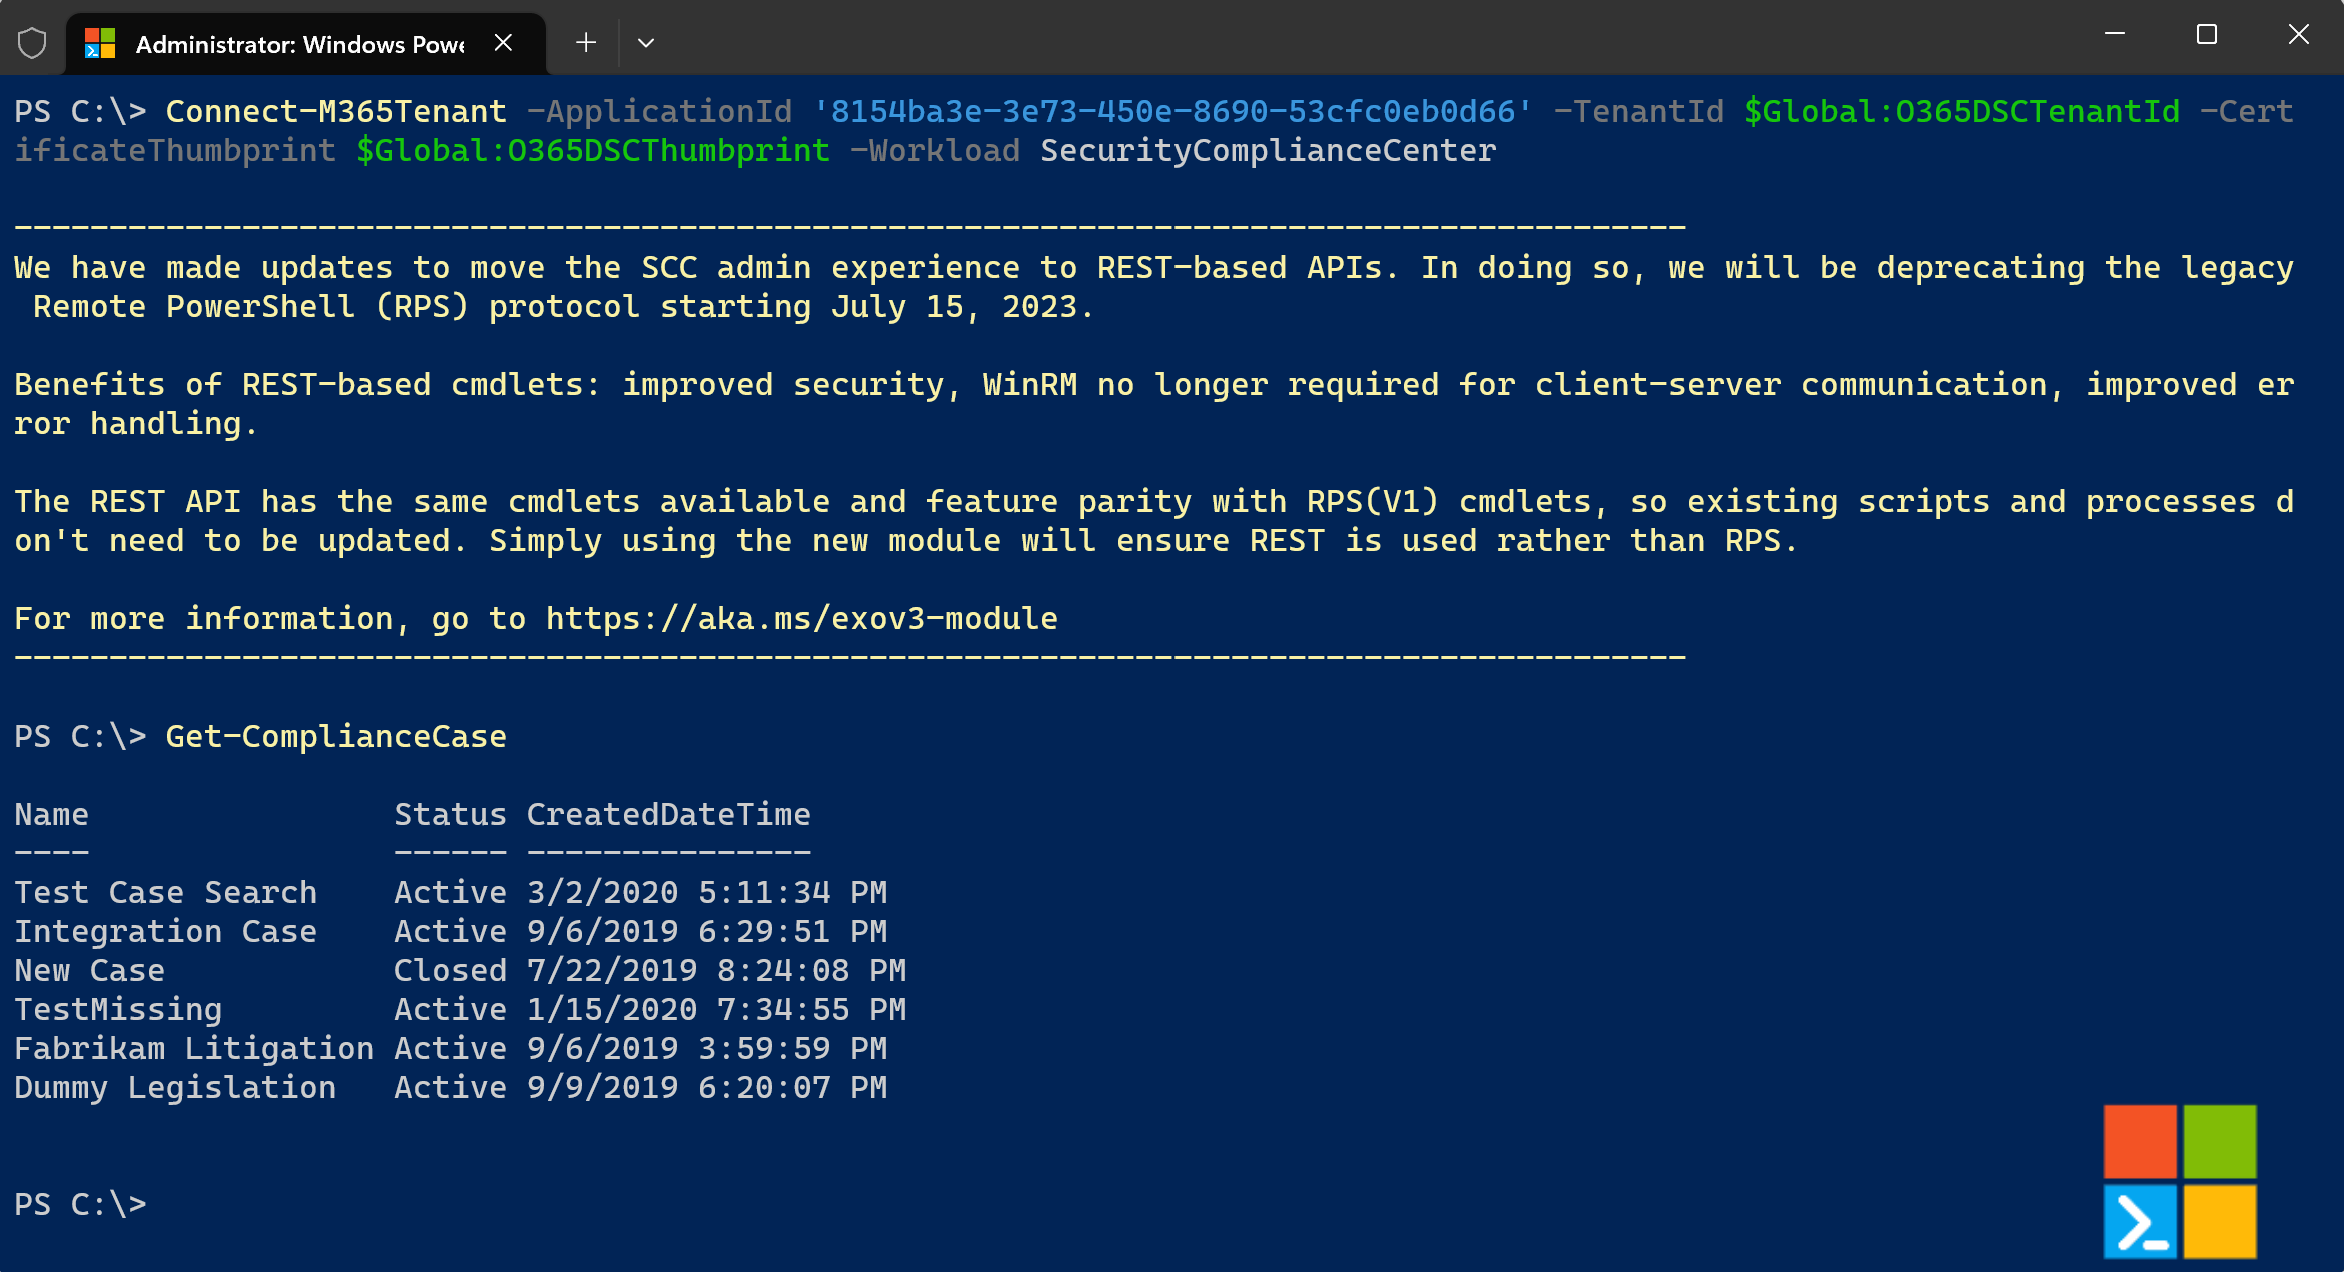
Connect-M365Tenant -ApplicationId '8154ba3e-3e73-450e-8690-53cfc0eb0d66' -TenantId 'xxxx.onmicrosoft.com' -CertificateThumbprint 'xxx-xxx-xxx-xxx-xxx' -Workload 'SecurityComplianceCenter'
Get-ComplianceCase
Permissions for SharePoint and OneDrive
The latest version of Microsoft365DSC support both user and AzureAD App principal authentication. It is recommended to use AzureAD app authentication for several reasons. The first is that when granting permission to the AAD App it will ensure it has permissions to all SharePoint and OneDrive resources. The second reason is that most organizations enforce MFA authentication on user account that have roles assigned to them. This will cause issues when monitoring or apply changes to SharePoint or OneDrive as it will prompt for MFA numerous times. AzureAD app and user based authentication both can have passwords stored in compiled MOF files so ensure the are secured. Please refer to following video
User based authentication
When using a user account with Microsoft365DSC make sure the account is a cloud only user account for example admin@contoso.onmicrosoft.com. Microsoft365DSC uses account name for determining tenant within the resources so using federate accounts may cause issue when running Microsoft365DSC.
Roles and permissions
When using user based authentication several of the resources do support the Global reader role. The following resources support global reader:
- SPOApp
- SPOSearchManagedProperty
- SPOSearchResultSource
- SPOStorageEntity
- SPOTenantCdnEnabled
- SPOTenantCdnPolicy
- SPOUserProfileProperty
All SharePoint and OneDrive resources work with the SharePoint Admin role assigned. The SPOSiteGroup resource will error if the account doesn't have site collection admin permissions even if account is has the role of SharePoint admin. This is why we recommend using AAD App permissions. This role does provide full control so it can also be used for pushing configurations to your tenant. Lastly using an account that has Global Admin permissions typically permissions to entire tenant and can be used on all SharePoint and OneDrive resources.
When executing the Export-M365DSCConfiguration cmdlet user name and password should be filled in the following fields:

Azure AD app permissions
The best option when using Microsoft365DSC with SharePoint and OneDrive is to use an Azure AD app principal. When using AAD App permission Microsoft365DSC supports 2 different scenarios, certificate path option or installing certificate and using the thumbprint. The permissions required for Azure AD applications are SharePoint Site.FullControl.All scope.

Configure AzureAD app for Microsoft365DSC
The SharePoint PNP team created a cmdlet that simplifies the setup of AzureAD App called Register-PnPAzureADApp. The following script can be used to create the AzureAD app permissions needed for Microsoft365DSC
Register-PnPAzureADApp -ApplicationName TestApp2 -Tenant contoso.onmicrosoft.com -OutPath C:\DSC -CertificatePassword (ConvertTo-SecureString -String "password" -AsPlainText -Force) -Store CurrentUser -Scopes "SPO.Sites.FullControl.All"
This cmdlet will open a dialog box to authenticate to Azure AD and grant admin consent once its created the AzureAD app. It will also install the certificate in current user store and output a PFX file in the C:\DSC directory. If you plan to use the certificate thumbprint option when using DSC by default the LCM runs under the system account so easiest option to install in cert store is by using PSExec. To install certificate under system account using PSExec run the following:
1. .\PsExec.exe -s -i mmc.exe
2. File add / remove snapin > Select certificates > MyUser account
3. Open Certificate - Current User and select Personal
4. Select import certificate and browse to location from outpath in code from above and select the PFX file
After AzureAD app is created and certificate is installed you need some additional properties before you can use with Microsoft365DSC. Login to Azure Active Directory and browse to the App registrations page you should see the TestApp2 app created from the script above. We need to copy the following properties:


Using Certificate Thumbprint option
When running the export or creating configuration files for resources the following are the required parameters for authentication when using certificate thumbprint.
* ApplicationID
* TenantID  - This must be in format of contoso.onmicrosoft.com
* CertificateThumbprint
From the Export-M365DSCConfiguration GUI the following fields should be used:

Using Certificate Path option
There are times when using Microsoft365DSC you may need to use the certificate path option. For example using Azure DevOps to monitor tenant for configuration drift you would not have access to install certificates on the build agents. In this scenario using the certificate path option would be the best solution. The following parameters are required when using certificate path:
* ApplicationID
* TenantID  - this must be in format of contoso.onmicrosoft.com
* CertificatePath - this is path to the PFX certificate on local machine ex: c:\dsc\testapp2.pfx
* CertificatePassword - password for certificate
From the Export-M365DSCConfiguration GUI the following fields should be used:

Using Authentication in DSC configurations
See the next chapter to see how to use the Authentication options in DSC configurations
More information
- Authentication and authorization basics for Microsoft Graph
- Microsoft Graph permissions reference
- Quickstart: Register an application with the Microsoft identity platform
- Register an application with Azure AD and create a service principal
- Grant tenant-wide admin consent to an application
- API permissions